Tag Archives: Atmega8

Atmega 8 pin mapping

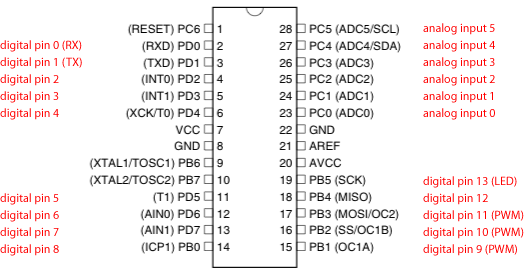
Atmega8 to Arduino pin mapping

Here is an easy to refer mapping of Atmega 8 pins to Arduino.  Credit of this image goes to user called “System” on Arduino forum https://forum.arduino.cc/u/system/summary

The image has been taken from the post https://forum.arduino.cc/t/pwm-didnt-work-on-atmega8/248564

A neat and to the point image like this is rare on the internet. I have just put the image here as a mirror of the original to ensure availability.

Continue reading Atmega8 to Arduino pin mapping

Burning Arduino Bootloader to Atmega8 or other Atmega

This is for all who are having problems in burning the Arduino Bootloader on an Atmega8 or any other Atmega Processor using a Arduino Board like Arduino Uno.

  1. The processor for the first time burning will have to be used with an external oscillator. I was trying without the external oscillator (was depending on the internal oscillator -  setup the fuses also properly) and was banging my head. 
  2. The Arduino Uno (or any other board that you are using) will have to be burned with the ArduinoISP code. (Files -> Examples -> ArduinoISP -> ArduinoISP)
  3. Don't bother about the Chip Configurations (and/or binary) that are available on the net, especially if you are looking to use the external oscillator. None works properly.Find a board from the existing list that uses the same Processor. 
  4. For Atmega8 use the "Arduino NG or older" from the boards list. That board should also work for Atmega168
  5. If you are using a 8MHZ crystal then open the "boards.txt" files under "Program Files (x86)\Arduino\hardware\arduino\avr".  And edit the "atmegang.build.f_cpu". Change it to "8000000L".
  6. If you will be using the Internal Oscillator then you will have to change the fuse values to proper ones in the above board configuration.
  7. I had problems with high bitrate while burning. So I changed it to "9600" (atmegang.upload.speed=9600).
  8. After you are done with the configurations and connections use the option "Burn Bootloader" under Tools in the Arduino IDE


I also found tutorials where it was suggested to remove the processor from board (UNO board) which is being used as programmer. Don’t do that.

Putting the chip in an UNO board didn’t work for me. I don’t know why but it didn’t.

What I found is the Atmega8 works best with the external oscillator. With an internal oscillator I was having problems after running the chip continuously for quite some time.


The connections with an Arduino UNO
------------------                --------------------------
Arduino Uno                         Atmega 8 or other
------------------                --------------------------
10                                      Reset  (1 on Atmega8)
11                                      MOSI   (17 on Atmega8)
12                                      MISO   (18 on Atmega8)
13                                      SCLK   (19 on Atmega8)
And the AVCC pin should be externally connected to VCC, even if the ADC is not used.


And like many suggested on the Internet already, a standalone programmer is the best. I got a USBasp from eBay.

And I guess it is better to invest in a 328p processor due to limited resource of Atmega8 chip. More or less same price.

Atmega8 IC can be used as standalone IC, that is without using the whole Arduino board. Please see this article for details : Using Atmega8 or Atmega328p directly without using Arduino boards and Atmega8 to Arduino pin mapping


Eagle PCB Library Atmega8 TQFP32

The Atmega8 TQFP32 package that is mostly available, for Eagle PCB, has the pins too thick to be handled in DIY or Homemade PCBs. The Atmega8-AI package in the attached library has been modified such that the pins are wide enough for proper placement/soldering of the chip and thin enough so that there is sufficient room between two adjacent pins while soldering the chip by hand.

Atmega8 TQFP32