| Technology | L voltage | H voltage | Notes |
|---|---|---|---|
| CMOS | 0 V to 1/3 VDD | 2/3 VDD to VDD | VDD = supply voltage |
| TTL | 0 V to 0.8 V | 2 V to VCC | VCC = 5 V ±10% |
All posts by Manish
Interfacing 16×2 LCD with Arduino
The 16×2 LCD is a cheap display that can be used to display text output from an Arduino.
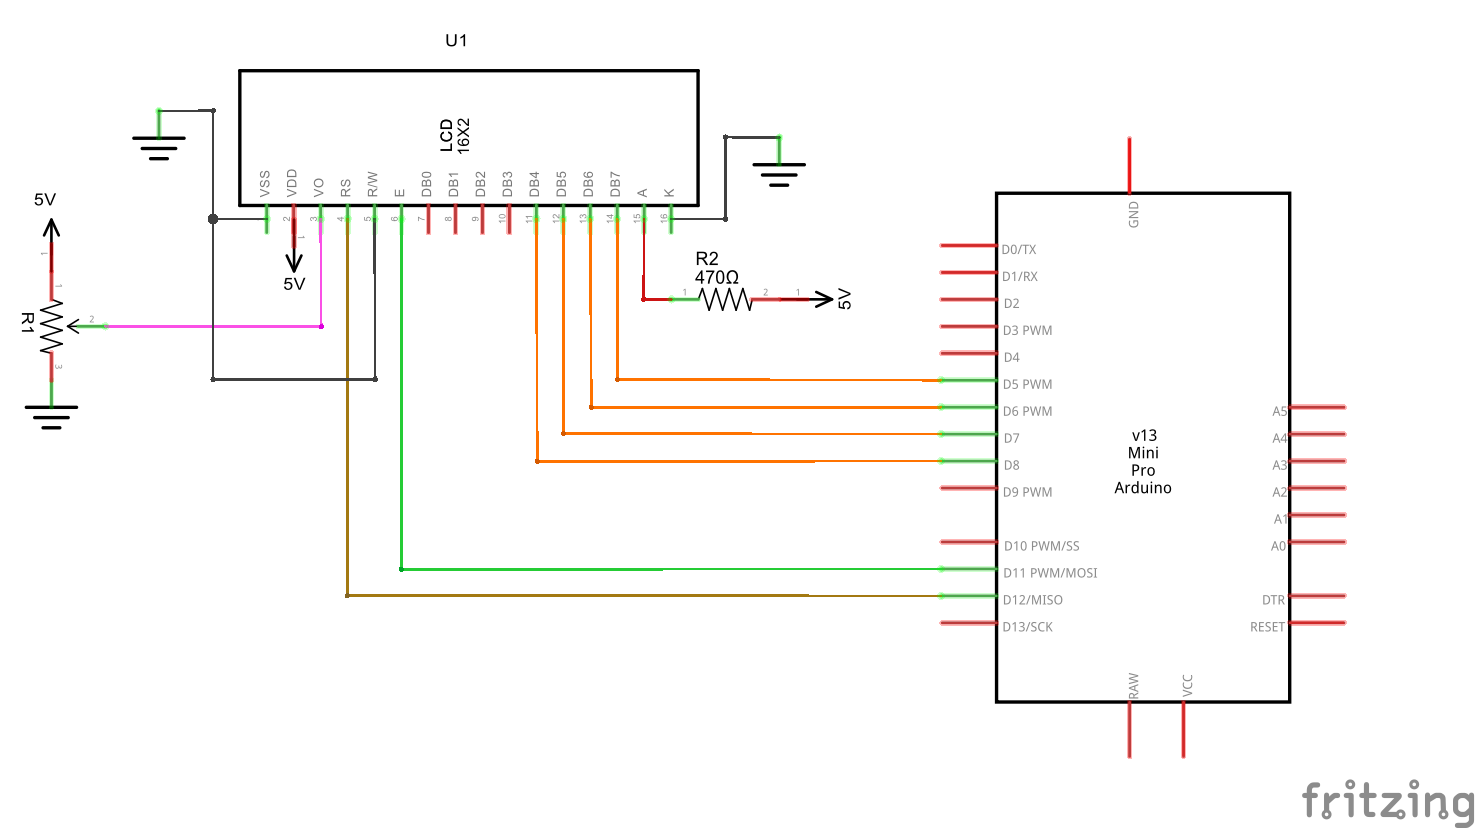
Below is the schematic
- The VO is for setting the contrast (or readability) of the characters.
- A and K are the LED pins (backlight of the LCD)
Arduino has libraries for interfacing with this type of LCDs. The library has various examples including for text scrolling.
Basic example – simple text print
// include the library code:
#include <LiquidCrystal.h>

// initialize the library with the numbers of the interface pins
LiquidCrystal lcd(12, 11, 5, 4, 3, 2); // RS, Enable, D4, D5, D6, D7

void setup()
{
  // set up the LCD's number of columns and rows:
  lcd.begin(16, 2);
  // Print a message to the LCD.
  lcd.print("hello, world!");
}
Change the photo auto retrieved by FB when posting link or URL
- Open this link https://developers.facebook.com/tools/debug/
- Paste the URL
- Hit “Debug”
- Hit “Scrape Again”
- Didn’t work? Use the “Batch Invalidator” to invalidate the cache and then try steps 3 and 4
- Didn’t work? Try “Scrape Via API” and then try steps 3 and 4
Aletrnate URL : https://developers.facebook.com/tools/debug/og/object/
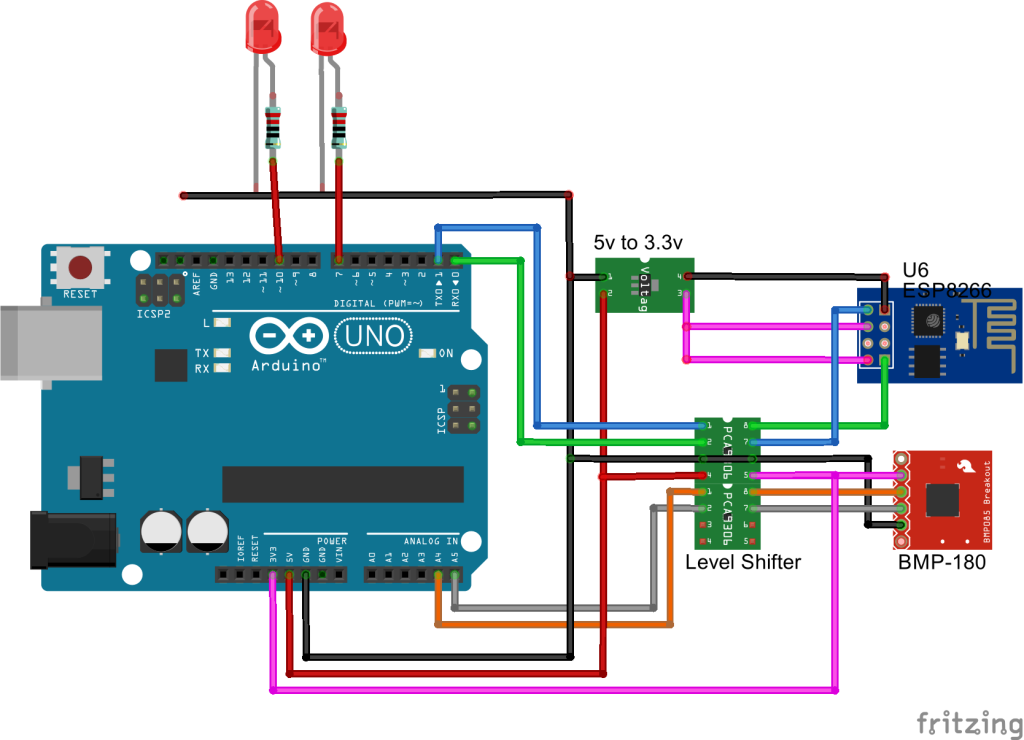
Connect Arduino and BMP 180 to Cloud
BMP-180
- SCL – Grey wire
- SDA – Orange Wire
Notes:
- Here the hardware TX and RX has been used for performance.
The code:
See Arduino – Communicate with Server – Part 1
Updated code will be posted here some time soon.
For more details on ESP 8266 please see the article “https://www.kolkataonweb.com/code-bank/arduino/esp8266-esp-01/“
Install PHPMumbleAdmin
https://sourceforge.net/projects/phpmumbleadmin/?source=typ_redirect
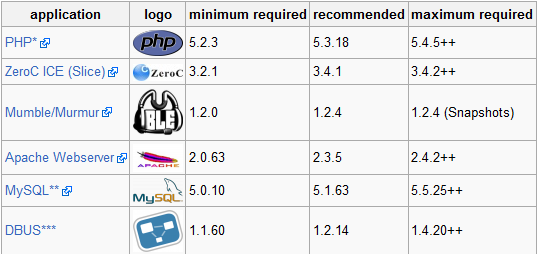
Quick Guide of Requirements
Install PHP* 5.3
wget http://in1.php.net/distributions/php-5.3.29.tar.bz2
tar -xvf php-5.3.29.tar.bz2
cd php-5.3.29
./configure
make
make install

Notes:
Additional packages might need to be installed
apt-get install gcc
apt-get install libxml2-dev
apt-get install libapache2-mod-php5
Install ZeroC ICE (Slice)
Though the requirement guide says the max version should be 3.4.x, but 3.6 also works fine.
- apt-get install php5-zeroc-ice
- apt-get install php5-zeroc-ice-dev
- wget https://zeroc.com/download/GPG-KEY-zeroc-release
- apt-key add GPG-KEY-zeroc-release
- apt-add-repository “deb http://zeroc.com/download/apt/ubuntu14.04 stable main”
- apt-get update
- apt-get install php5-zeroc-ice
- apt-get install libmcpp0 php5-common php5-json
- apt-get remove libzeroc-ice3.6 // apt-get remove libzeroc-ice
- apt-get install zeroc-ice-all-runtime zeroc-ice-all-dev
- apt-get install db5.3-util
- apt-get source zeroc-ice3.6
- apt-get install php5-zeroc-ice
- apt-get install php5-zeroc-ice-dev
- apt-get install zeroc-ice-slice
Install DBUS
- wget http://dbus.freedesktop.org/releases/dbus/dbus-1.2.14.tar.gz
- tar -zxf dbus-1.2.14.tar.gz
- Add Group if not there:
groupadd -g 18 messagebus && useradd -c "D-Bus Message Daemon User" -d /var/run/dbus \ -u 18 -g messagebus -s /bin/false messagebus -
./configure --prefix=/usr \ --sysconfdir=/etc \ --localstatedir=/var \ --disable-doxygen-docs \ --disable-xml-docs \ --disable-static \ --disable-systemd \ --without-systemdsystemunitdir \ --with-console-auth-dir=/run/console/ \ --docdir=/usr/share/doc/dbus-1.10.8 && make -
make install
Notes
Additional packages might be needed
apt-get install libexpat1-dev
Install PHPMumleAdmin
- wget http://tenet.dl.sourceforge.net/project/phpmumbleadmin/phpMumbleAdmin-0.4.4.zip
- unzip phpMumbleAdmin-0.4.4.zip
- Open in browser
- Default SuperUser is “SuperUser” and the password that was given at the time of setup of Mumble Server.
Notes:
Had to change all folders to 777 ( find ./ -type d -exec chmod 777 {} \; ) as quick fix for folder permissions.
To-do:
Need to cleanup, optimize the installation and set proper folder permissions.
Installing Mumble on Ubuntu 14.04
The installation steps
- add-apt-repository ppa:mumble/release
- apt-get update
- apt-get install mumble
- apt-get install mumble-server
- dpkg-reconfigure mumble-server (select High in the priority step)
Adding Users
- adduser <username>
Addition of channels
- Can be done from the Mumble desktop client (The desktop clients are available here http://www.mumble.com/mumble-download.php)
Wiki Page
Todo:
- http://wiki.mumble.info/wiki/Features#Access_Control_Groups
- http://wiki.mumble.info/wiki/Authenticators
Arduino – Bluetooth Communication Using HC-05
HC-05 is a cheap (and easy to use) module that can be used to provide bluetooth connectivity to Arduino.
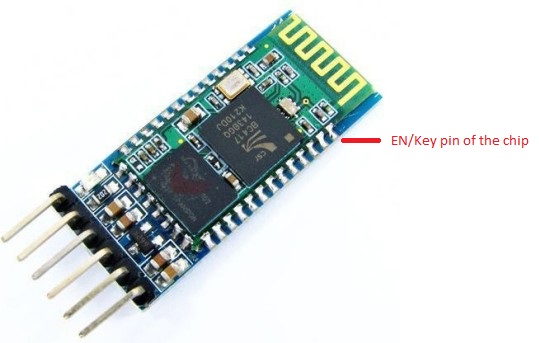
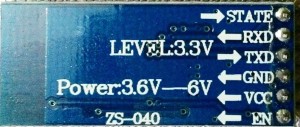
There are cheap breakout boards available on ebay that can be powered directly by the 5v supply of the Arduino. Below is a picture of such a breakout board. Though my board has “level 3.3v” written but it is working fine on 5v I/O levels. I haven’t run it continuously for days yet but at least a few hours didn’t kill the chip.
Some of these boards has one problem - the EN/Key pin, of the board, required for programming the chip (through AT commands) is not connected to the EN/Key pin of the chip. To program the chip on such a board, manual shorting is needed (using some wire) between the EN/Key chip on the board and the chip. In the above picture the EN/Key pin has been marked.
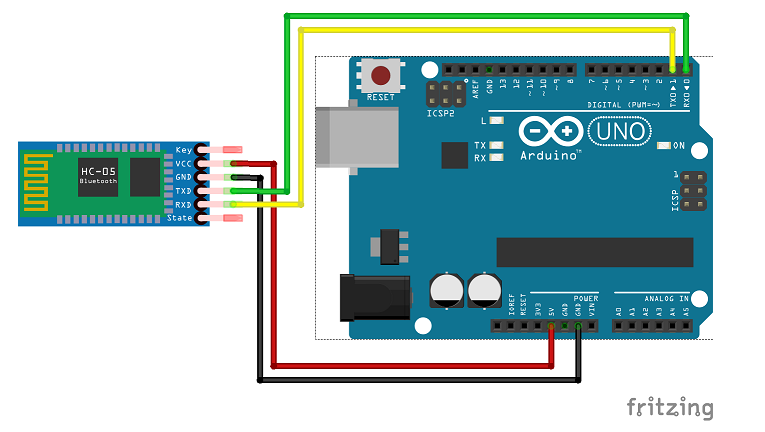
The circuit is pretty simple, connect the VCC to the 5v supply of Arduino, GND to GND, Rx of the module to Tx of Arduino and Tx of the module to Rx of Arduino. For the Rx and Tx software serial ports can be used also.
The same circuit goes for HM-10 too, which is a BLE device.
ESP 8266 – ESP 01 – Installing Non-OS SDK
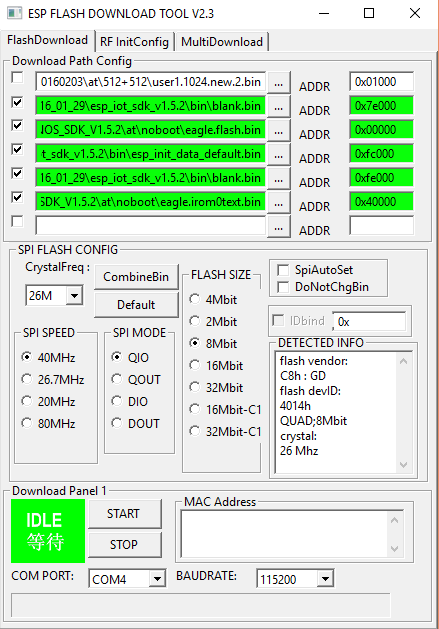
After a bit of trial and error got the Non-OS SDK installed. To flash the Non-OS SDK, two sets of files are needed. Below are the download links
- ESP8266_NONOS_SDK_V1.5.2_16_01_29 on Expressif site OR from here
- [AT Release] ESP8266_AT_V0.60 based on ESP8266_NONOS_SDK_V1.5.2 on Expressif Site OR from here
The flashing tool is attached here for convenience.
Now the important part, the mapping (where I was going wrong) and flashing. Please check the documentation for the appropriate mapping. This is for Flash Size & Map: 8Mbit(512KB+512KB)
- ESP8266_NONOS_SDK_V1.5.2_16_01_29\esp_iot_sdk_v1.5.2\bin\blank.bin — 0x7e000
- AT_V0.60_on_ESP8266_NONOS_SDK_V1.5.2_20160203\at\noboot\eagle.flash.bin — 0x00000
- ESP8266_NONOS_SDK_V1.5.2_16_01_29\esp_iot_sdk_v1.5.2\bin\esp_init_data_default.bin — 0xfc000
- ESP8266_NONOS_SDK_V1.5.2_16_01_29\esp_iot_sdk_v1.5.2\bin\blank.bin — 0xfe000
- AT_V0.60_on_ESP8266_NONOS_SDK_V1.5.2_20160203\at\noboot\eagle.irom0text.bin — 0x40000
Here is the AT command manual for ESP 8266
As on date of writing a Patch has been released which can be downloaded from here or here — this patch didn’t work for me. The module is constantly sending some garbage making it unusable.
USB To RS232 convertor drivers
The two most popular USB to RS232 converters are based on either “CH340G” chip or the “PL2303” chip. Below are the drivers (latest as on 02-March-2016) for both.
While purchasing, check if the module has the DTR pin or not. It is not a necessity but will be easy to program the Arduino boards. Without the DTR line the Arduino will have to be RESET manually while uploading the codes to the Arduino.
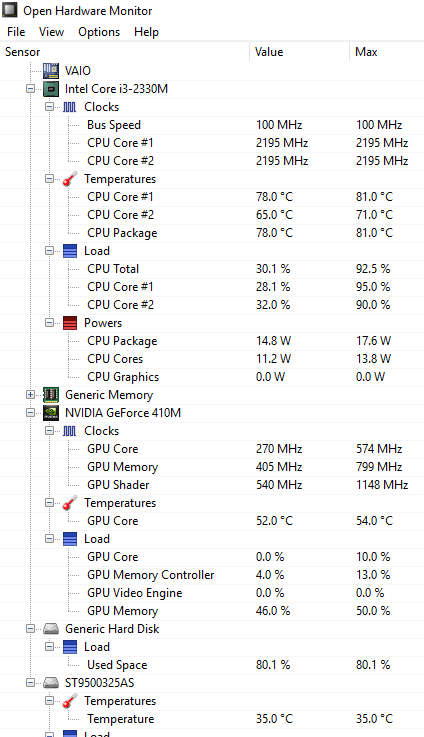
Open Hardware Monitor
A nice and handy tool for viewing hardware stats including temperatures of CPU, Graphics processor, hard drives etc.
