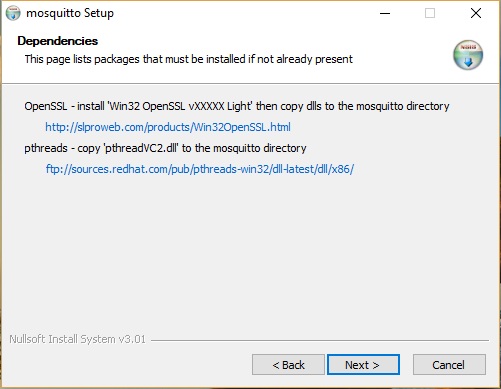
- Download the Win32 installer from the below link (I couldn’t successfully installed the CygWin version)
https://mosquitto.org/download/ - Once downloaded, install the package
- During the start of the installation process it will show links from where some dependencies will have to be downloaded

- Copy/Open the links
- Once the installation finishes go to the websites opened in the previous step
- Download the OpenSSL installer and the pthreadVC2.dll file
- Install the OpenSSL
- Copy the pthreadVC2.dll file to the directory where mosquitto executable has been installed. Normally C:\Program Files (x86)\mosquitto
- Open folder where OpenSSL got installed (normally C:\OpenSSL\) and open the lib folder (normally C:\OpenSSL\lib)
- Copy ssleay32.lib and libeay32.lib into the folder where mosquitto executable has been installed.
- Please note – while copying the files Windows might ask for giving Admin permission. Go ahead.
- At this point Mosquitto should be ready to run————————————————————–
- Now testing mosquitto
- Open a Command Prompt
- Goto the folder where mosquitto is installed
- Give command mosquitto.exe -v -c mosquitto.conf
- The server should now start listening on port 1883
- Now open another Command Prompt
- Give the command mosquitto_sub -h localhost -t channel1/data1
- Open a third Command Prompt and give the command mosquitto_pub -h localhost -t channel1/data1 -m “test data”
- In the command prompt where we used mosquitto_sub (step 18 and 19) will show the message “test data” sent from the third command prompt.
- Reaching this point means mosquitto is working fine———————————————-
- To secure the transmission we can username and password authentication
- Open a command prompt with Admin privileges
- Goto the folder where Mosquitto is installed
- Create a password file (for the first time only) using the command mosquitto_passwd.exe -c passfile.txt username
- It will ask for password. Give the password and confirm the password
- After this point further users can be added using the below command mosquitto_passwd.exe -b passfile.txt username password
Please note – this time we supplied the password also along with the username - Now edit the config file (mosquitto.conf normally located in C:\Program Files (x86)\mosquitto) to enforce only authenticated data transfers
- Uncomment allow_anonymous and set it false
- Uncomment password_file and put the password file name after it. It will look like password_file passfile.txt
- Now onwards all sub and pub requests will have to be with username and password of a user whose details exists in the password file. Examples below
mosquitto_pub -h localhost -t channel1/data1 -m "test data" -u john -P johnpass

mosquitto_sub -h localhost -t channel1/data1 -u jane -P janepass
- Access control can be done using a acl file or using mosquitto-auth-plug (https://github.com/jpmens/mosquitto-auth-plug)
- There should be a aclfile.example inside your mqtt directory. If not then also no problem we will shortly see the contents of the file below.
- Create a file with any name. Here we will use aclFile.txt
- In the mosquitto.conf file uncomment acl_file and put the name of your acl file after that. It will look something like acl_file aclFile.txt
- Example content of aclFile.txt as below
 # user jane given full permission to channel1/data1 and only read permission to channel1/data2
user jane
topic channel1/data1
topic read channel1/data2

# user jane given full permission to both data1 and data2 channel
user john
topic channel1/#
Please put in your suggestions in comment.
MQTT on Windows — Download link of Word File containing the above steps. WordPress had made some filenames missing. So uploaded the original word doc.