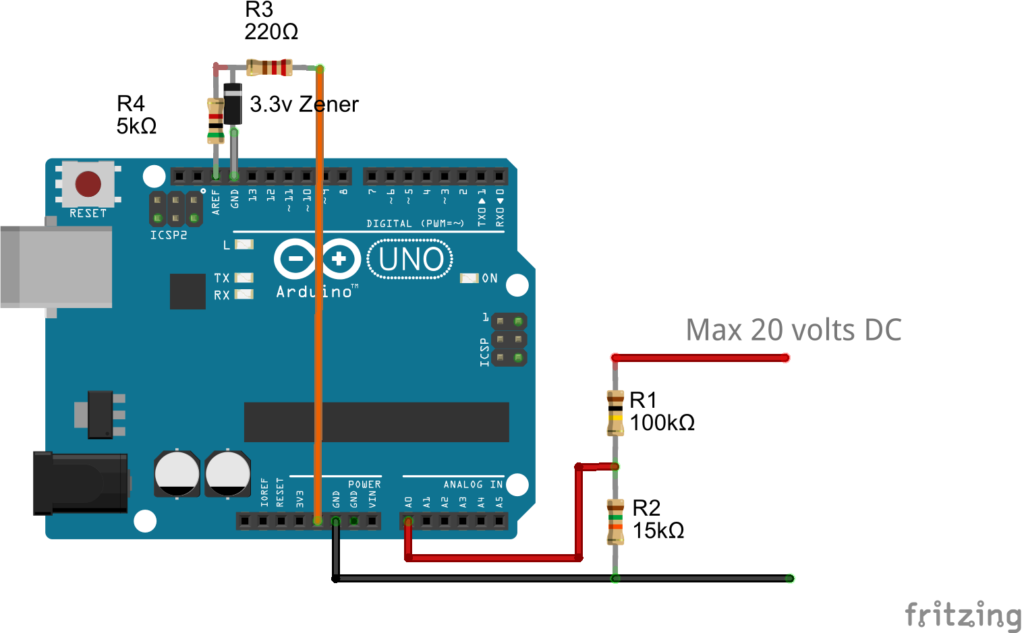
On some Arduino boards there is a Pin labelled as AREF or Analog Reference. This pin is very useful in cases where a stable and precise voltage reference is needed for the ADC. Practically the supplied voltage to the board can vary a bit, specially it can fall below the rated voltage depending on the load to the board.
By default Arduino uses the voltage of the board, that is 5v or 3.3v (depending on the board). Using the function analogReference() this can be changed. The function accepts one parameter called type. If the type mentioned is DEFAULT then it will use the voltage of the board. INTERNAL type will use a built-in reference equal to 1.1 volts on the ATmega168 or ATmega328 and 2.56 volts on the ATmega8. And EXTERNAL will use the voltage supplied to the AREF pin.
(More about analogReference can be read at https://www.arduino.cc/en/Reference/AnalogReference)
Please note the voltage at AREF can 0-5 volts only and the input voltage at the I/O pin (here A0) cannot exceed that of the AREF pin.
The simple voltmeter described in a previous article has been modified here. It is now supplied with a precise reference voltage at the AREF pin.
The 5K resistance is not a necessity, it has been added for safety (switching to the INTERNAL while external power is given to AREF can damage the board with that resistance). If the resistance is used then the voltage at AREF will not be exact as supplied. That is because internally there is a 32k resistor connected to the AREF pin.
So in above case the voltage that the AREF actually getting is 3.3*32/(32+5) = 2.8540 (the actual will vary due to tolerance of components, so for cases where high precision is needed, the values of the resistors will have to be measured and also the voltage of the zener, and the voltage in the code nees to be changed accordingly).
#define READINGS 5

int sensorPin = A0;
short int readingsTaken = 0;
float voltage = 0.0, readingTotal = 0.0;

void setup() {
  // put your setup code here, to run once:
  pinMode(sensorPin, INPUT);
  analogReference(EXTERNAL);
  Serial.begin(9600);
}

void loop() {
  // put your main code here, to run repeatedly:
  readingTotal = 0.0;
  readingsTaken = 0;

  // we will take 5 readings at 1 sec interval and then do an average of that
  while(readingsTaken < READINGS)
  {
    readingTotal += analogRead(sensorPin);
    readingsTaken++;
    delay(1000); //at every 1 second interval
  }

  voltage = (readingTotal/READINGS) * (2.8540/1024); // 2.8540 is the ref voltage being used. //the value in voltage at this point is what Arduino read based on input from voltage divider network. Need to calculate the original -- see below

  voltage = (20/2.609) * voltage; //unitary method to calculate the actual voltage that is read. When voltage read is 2.609, the input is 20v. With the above voltage divider used at input (100K ohm and 15k ohm) the input voltage at the I/O (pin A0) will be 2.609 when 20v is applied.

  Serial.println(voltage);
}

One comment